Are you tired of being stuck in a situation where you can't access your Raspberry Pi remotely because of firewalls? Well, buckle up because we’re about to dive deep into the world of Raspberry Pi VNC behind firewalls and how you can set up remote access for free. Whether you’re a tech enthusiast, a student, or just someone who loves tinkering with gadgets, this guide is here to help you unlock the full potential of your Raspberry Pi without breaking the bank.
Nowadays, remote access is more than just a convenience—it's a necessity. From monitoring home automation systems to running complex projects, having seamless access to your Raspberry Pi from anywhere is crucial. But what happens when pesky firewalls get in the way? Don’t worry; we’ve got you covered. This article will walk you through everything you need to know to set up VNC on your Raspberry Pi, even when firewalls are blocking the way.
By the end of this guide, you'll not only understand how to configure VNC but also how to bypass firewalls without spending a dime. Let’s get started, shall we? But first, let’s take a quick look at what we’ll be covering in this article:
Read also:Karely Ruiz Erome The Rising Star You Need To Know
- What is VNC?
- Raspberry Pi VNC Setup
- Firewall Challenges and Solutions
- Free VNC Options for Raspberry Pi
- Software Downloads and Installation
- Troubleshooting Tips
- Security Best Practices
- Performance Optimization
- Alternative Solutions
- Conclusion
What is VNC and Why Should You Care?
VNC, or Virtual Network Computing, is a technology that allows you to remotely control another computer over a network. Think of it as a remote control for your devices. With VNC, you can access your Raspberry Pi's desktop interface as if you were sitting right in front of it. This is super handy if you're working on projects that require frequent monitoring or troubleshooting.
But here's the thing: VNC isn’t just about convenience. It’s also about efficiency. Whether you're running a server, managing IoT devices, or testing software, having remote access can save you tons of time and effort. Plus, it’s a great way to learn more about networking and cybersecurity.
Now, let’s talk about the elephant in the room: firewalls. Firewalls are designed to protect your network from unauthorized access, but sometimes they can be a bit too overprotective. If you’re trying to access your Raspberry Pi from outside your local network, firewalls can make things tricky. But don’t worry—we’ll show you how to navigate around them without compromising security.
Raspberry Pi VNC Setup: Step-by-Step Guide
Getting Started with Raspberry Pi VNC
Before we dive into the firewall stuff, let’s first set up VNC on your Raspberry Pi. Here’s a quick rundown of what you need to do:
- Make sure your Raspberry Pi is up and running. If you haven’t set it up yet, now’s the time to do it.
- Connect your Raspberry Pi to your local network. You can use either Wi-Fi or Ethernet—it’s up to you.
- Update your Raspberry Pi’s software by running the following commands in the terminal:
sudo apt update && sudo apt upgrade
Once your system is up to date, it’s time to install VNC Server. You can do this by running:
Read also:Rossi Criminal Minds The Ultimate Guide To His Role And Character
sudo apt install realvnc-vnc-server realvnc-vnc-viewer
That’s it! VNC Server is now installed on your Raspberry Pi. But before you can access it remotely, you’ll need to configure a few settings.
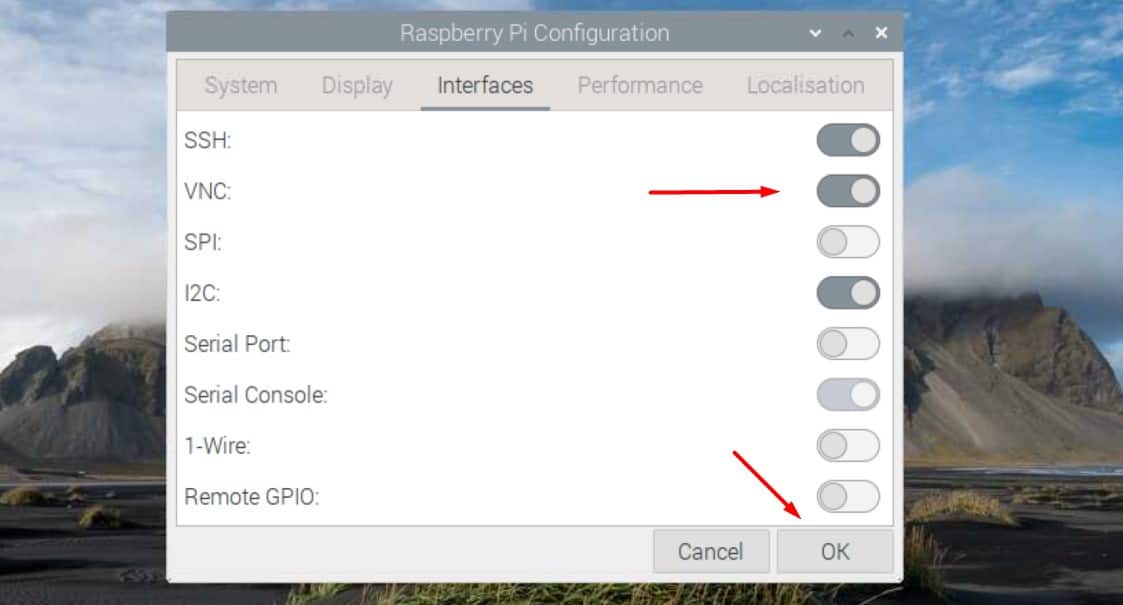
Configuring VNC on Raspberry Pi
To configure VNC, follow these steps:
- Open the Raspberry Pi Configuration tool by typing “sudo raspi-config” in the terminal.
- Navigate to “Interfacing Options” and enable VNC.
- Set a password for your VNC connection. This is important for security reasons.
- Reboot your Raspberry Pi to apply the changes.
Now that VNC is set up, you can connect to your Raspberry Pi using a VNC Viewer app on your computer or mobile device. But what if you’re trying to access it from outside your local network? That’s where firewalls come into play.
Firewall Challenges and How to Overcome Them
Firewalls are like bouncers at a nightclub—they decide who gets in and who doesn’t. While they’re great for security, they can be a pain when you’re trying to access your Raspberry Pi remotely. Here’s how you can deal with them:
Port Forwarding: The Key to Unlocking Remote Access
One of the most common ways to bypass firewalls is by setting up port forwarding on your router. Port forwarding allows you to direct incoming traffic to a specific device on your network—in this case, your Raspberry Pi.
Here’s how you can set up port forwarding:
- Log in to your router’s admin interface. You’ll usually need your router’s IP address and login credentials for this.
- Find the port forwarding section. This might be labeled differently depending on your router’s brand.
- Add a new rule for port forwarding. Use port 5900 (the default VNC port) and point it to your Raspberry Pi’s local IP address.
- Save the changes and test your setup by trying to connect to your Raspberry Pi from outside your network.
Port forwarding can be a bit tricky, so if you’re not comfortable doing it yourself, you might want to consult your router’s manual or seek help from a tech-savvy friend.
Free VNC Options for Raspberry Pi
Not all VNC solutions are created equal. Some require you to pay for advanced features, while others are completely free. Here are a few free VNC options you can try:
- RealVNC: The official VNC solution for Raspberry Pi. It’s free for personal use and offers a ton of features.
- TightVNC: A lightweight VNC server that’s great for resource-constrained devices like the Raspberry Pi.
- UltraVNC: Another popular VNC option that supports advanced features like file transfer and encryption.
Each of these options has its own strengths and weaknesses, so it’s worth experimenting to see which one works best for you.
Software Downloads and Installation
Now that you know which VNC options are available, let’s talk about how to download and install them. Here’s a quick guide:
Downloading RealVNC
RealVNC is available directly from the Raspberry Pi OS repository, so you don’t need to download anything manually. Just run the following command:
sudo apt install realvnc-vnc-server realvnc-vnc-viewer
Downloading TightVNC
If you prefer TightVNC, you can download it from the official website or install it via the terminal:
sudo apt install tightvncserver
Downloading UltraVNC
UltraVNC isn’t available in the Raspberry Pi OS repository, so you’ll need to download it manually. Visit the official website and follow the installation instructions for Linux.
Troubleshooting Tips
Even the best-laid plans can go awry, and sometimes things just don’t work as expected. Here are a few troubleshooting tips to help you out:
- Make sure your Raspberry Pi is connected to the network and has a valid IP address.
- Check your router’s port forwarding settings to ensure they’re configured correctly.
- Try restarting your Raspberry Pi and router if you’re having connectivity issues.
- Use tools like ping and traceroute to diagnose network problems.
Remember, troubleshooting is all about patience and persistence. If something doesn’t work the first time, don’t give up. Keep trying until you figure it out.
Security Best Practices for Raspberry Pi VNC
Security should always be a top priority, especially when you’re dealing with remote access. Here are a few best practices to keep your Raspberry Pi safe:
- Use strong, unique passwords for your VNC connection.
- Enable encryption to protect your data from prying eyes.
- Limit access to trusted devices and networks.
- Keep your software up to date to patch any security vulnerabilities.
By following these best practices, you can enjoy the convenience of remote access without compromising your security.
Performance Optimization for Raspberry Pi VNC
While VNC is a powerful tool, it can sometimes feel a bit sluggish, especially if you’re accessing your Raspberry Pi over a slow connection. Here are a few tips to optimize performance:
- Lower the screen resolution to reduce the amount of data being transmitted.
- Disable unnecessary visual effects and animations.
- Use compression to speed up data transfer.
- Choose a VNC server that’s optimized for performance, like TightVNC.
By tweaking these settings, you can make your VNC experience smoother and more enjoyable.
Alternative Solutions for Remote Access
VNC isn’t the only game in town when it comes to remote access. Here are a few alternative solutions you might want to consider:
- SSH: A secure way to access your Raspberry Pi’s command line interface remotely.
- TeamViewer: A popular remote access tool that works on a variety of platforms.
- NoMachine: A high-performance remote access solution that offers both free and paid options.
Each of these alternatives has its own advantages and disadvantages, so it’s worth exploring them to see which one fits your needs best.
Conclusion
Remote access to your Raspberry Pi doesn’t have to be a headache, even when firewalls are involved. By following the steps outlined in this guide, you can set up VNC on your Raspberry Pi and access it from anywhere for free. Just remember to configure your firewall settings properly and follow security best practices to keep your device safe.
So what are you waiting for? Give it a try and see how much easier your life can be with remote access to your Raspberry Pi. And don’t forget to share your experiences in the comments below. Who knows? You might just help someone else out along the way.